Letswish
4 分钟
搞了一台easypi r1做旁路由,想用sing-box,但是没找到能用的版本,闲来无事就折腾了一下。纯小白,很多东西可能都不大对,但能跑起来  。 CPU:RK3568 ARMv8 Processor rev 0 目标平台:rockchip/rk35xx RAM:4GB OS:iStore 固件版本:iStoreOS 22.03.7 2025040711 / LuCI istoreos-22.03 branch git-24.339.46321-5f9267c 一、编译适合自己平台的sing-box 若能通过opkg等方式找到sing-box,可跳过此步 大致流程:使用OpenWrt SDK + Go在虚拟机上从sing-box源代码中编译 - 查看OpenWrt版本,CPU架构,目标平台
cat /etc/openwrt_release
其中
DISTRIB_RELEASE 版本号 指<OpenWrt版本号>
DISTRIB_TARGET 目标平台 指本固件是为该<硬件平台>编译的
DISTRIB_ARCH 目标架构 固件编译针对的 <CPU 架构_核心>
- 下载对应版本的OpenWrt SDK
Index of /releases/
按以下目录顺序找
<DISTRIB_RELEASE> ⇒ targets ⇒ <DISTRIB_TARGET > ⇒ <DISTRIB_ARCH > ⇒
下载 openwrt-sdk……-X86_64.tar.xz文件
- 配置OpenWrt SDK环境
Linux 虚拟机中解压OpenWrt SDK
tar -xvf <openwrt-sdk文件>
进入文件夹内,按以下路径找到编译工具所在目录
openwrt-sdk内 ⇒ staging_dir ⇒ toolchain-??? ⇒ bin
将bin的绝对路径导入到系统变量Path中
export PATH=“$PATH:<上述查找到的bin的路径>”
- 下载所需版本的sing-box源代码
Releases · SagerNet/sing-box · GitHub
对应版本 → Source code(tar.gz)
在Linux虚拟机中解压
- 安装指定版本的GO
- 编译sing-box
- 进入sing-box源代码目录
- 运行以下命令
- <ol style="padding-left: 1.25em; clear: both;"><li><pre class="codeblock-buttons" style="font-size: 1em; max-height: 2000px; position: relative; overflow: visible;"><code style="color: rgb(67, 67, 67); background: none 0% 0% / auto repeat scroll padding-box border-box rgb(248, 248, 248); border-radius: 2px; line-height: 1.30769; overflow: auto; tab-size: 4; display: block; padding: 12px 2.75em 12px 12px; max-height: 500px;">GOOS=linux GOARCH=arm64 CGO_ENABLED=1 CC=aarch64-openwrt-linux-musl-gcc go build -v -tags "with_grpc with_utls with_clash_api" ./cmd/sing-box
- </code></pre></li></ol><p></p>
其中:
GOOS = 编译出来的文件将在哪个系统上运行,OpenWrt等系统都填 linux
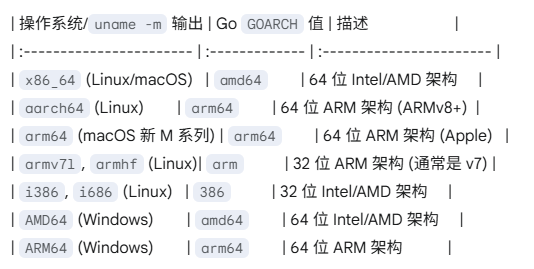
GOARCH = 编译出来的文件将在哪个CPU架构上运行, 直接查表找GOARCH
CGO_ENABLED = 1 不要改
CC = 指定交叉编译器,指向openwrt-sdk提供的gcc工具
在第3节配置openwrt-sdk环境变量时查找的bin文件夹,内含gcc工具。
一般名为:”xxxxxxxxx-musl-gcc”
由于已经配置了环境变量,只需要填这个文件的名字即可
-tags “with_grpc …” 参照sing-box官方编译指南 自定义需要编译的模块Build from source - sing-box
不编译某些模块会导致功能不完整 自行选配
编译完成,程序将在当前目录下,名为sing-box
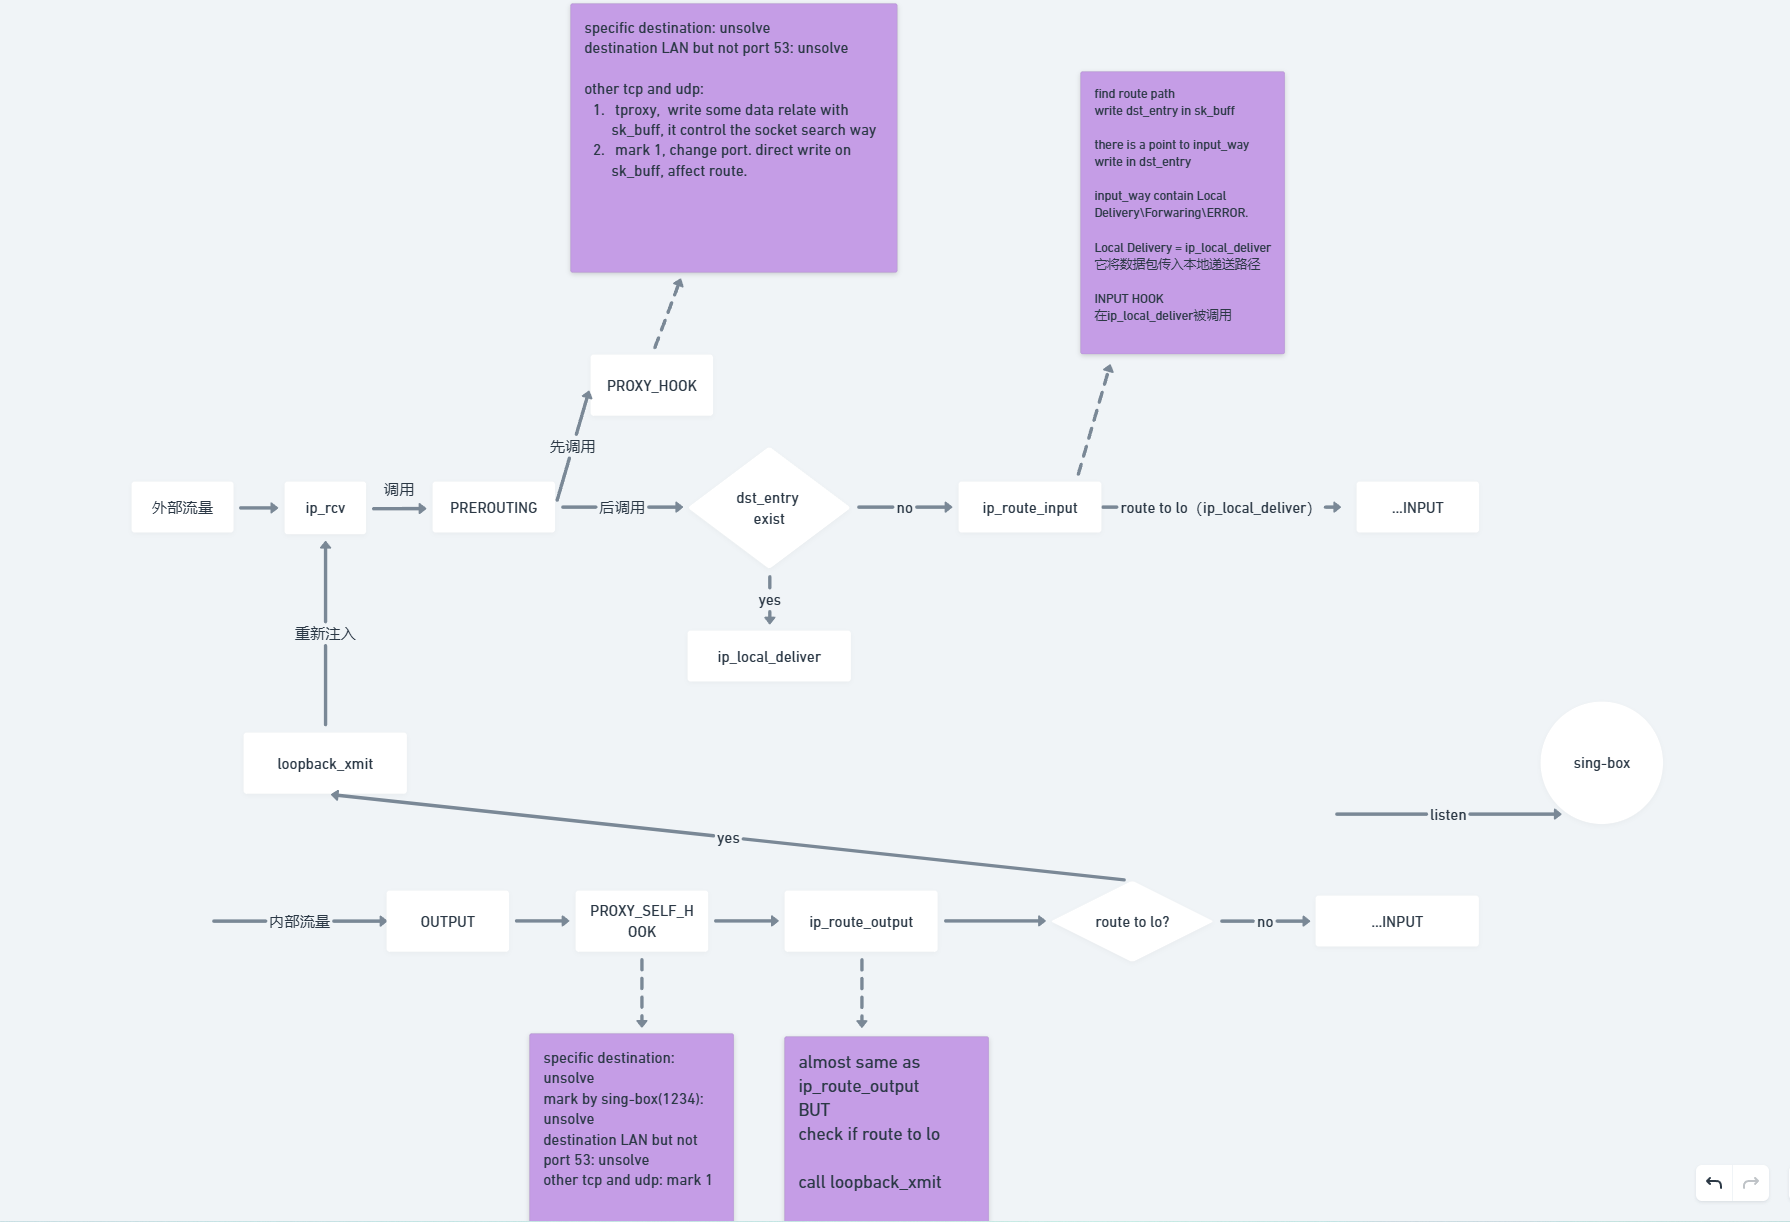
二、 配置TPROXY 本质上就是在Linux处理流量的流程中,插入一些操作和路由规则,使流量流入sing-box中。 如何插入?: iptables 和 ip route 路由表 iptables允许用户在Netfilter中自定义钩子函数 Netfilter是Linux处理网络流程的一套框架,可以理解成里面有多个函数,在处理流量的过程中被逐个调用。 具体流程如下:全大写名称的是Netfilter中的处理函数。小写部分是Linux内核处理调用的函数。
简单来说,需要使用iptables添加PROXY钩子和PROXY_SELF钩子函数。它们的作用是将需要导入sing-box的流量进行标记。然后通过添加路由规则,将带有标记的流量传入sing-box中。 由于iptables的设置重启后会清除,可以通过在/etc/config/firewall增加导入脚本,让脚本执行iptables操作 vim /etc/config/firewall
- config include
- option type ‘script’
- option path ‘/etc/firewall.sing-box.tproxy’
vim /etc/firewall.sing-box.tproxy
#!/bin/shlisten_port= 12345 #sing-box监听的端口号app_mark= 1234 #sing-box做的标记mark=1 # 用于路由规则的标记iptables -t mangle -N PROXYiptables -t mangle -A PROXY -d 100.64.0.0/10 -j RETURNiptables -t mangle -A PROXY -d 127.0.0.0/8 -j RETURNiptables -t mangle -A PROXY -d 169.254.0.0/16 -j RETURNiptables -t mangle -A PROXY -d 172.16.0.0/12 -j RETURNiptables -t mangle -A PROXY -d 192.0.0.0/24 -j RETURNiptables -t mangle -A PROXY -d 224.0.0.0/4 -j RETURNiptables -t mangle -A PROXY -d 240.0.0.0/4 -j RETURNiptables -t mangle -A PROXY -d 255.255.255.255/32 -j RETURNiptables -t mangle -A PROXY -d 192.168.1.1/24 -p tcp ! --dport 53 -j RETURN #将 192.168.1.1/24 局域网网段iptables -t mangle -A PROXY -d 192.168.1.1/24 -p udp ! --dport 53 -j RETURN# 同上iptables -t mangle -A PROXY -p tcp -j TPROXY --on-port $listen_port --tproxy-mark $markiptables -t mangle -A PROXY -p udp -j TPROXY --on-port $listen_port --tproxy-mark $markiptables -t mangle -A PREROUTING -j PROXYiptables -t mangle -N PROXY_SELFiptables -t mangle -A PROXY_SELF -d 100.64.0.0/10 -j RETURNiptables -t mangle -A PROXY_SELF -d 127.0.0.0/8 -j RETURNiptables -t mangle -A PROXY_SELF -d 169.254.0.0/16 -j RETURNiptables -t mangle -A PROXY_SELF -d 172.16.0.0/12 -j RETURNiptables -t mangle -A PROXY_SELF -d 192.0.0.0/24 -j RETURNiptables -t mangle -A PROXY_SELF -d 224.0.0.0/4 -j RETURNiptables -t mangle -A PROXY_SELF -d 240.0.0.0/4 -j RETURNiptables -t mangle -A PROXY_SELF -d 255.255.255.255/32 -j RETURNiptables -t mangle -A PROXY_SELF -j RETURN -m mark --mark $app_markiptables -t mangle -A PROXY_SELF -d 192.168.1.1/24 -p tcp ! --dport 53 -j RETURN # 同上iptables -t mangle -A PROXY_SELF -d 192.168.1.1/24 -p udp ! --dport 53 -j RETURN # 同上iptables -t mangle -A PROXY_SELF -p tcp -j MARK --set-mark $markiptables -t mangle -A PROXY_SELF -p udp -j MARK --set-mark $markiptables -t mangle -A OUTPUT -j PROXY_SELFvim /etc/config/network
config rule option mark '1' option lookup '100' option priority '100'config route option interface 'loopback' option target '0.0.0.0' option netmask '0.0.0.0' option table '100' option type 'local'/etc/init.d/network reload /etc/init.d/firewall reload 三、 sing-box自启动 vim /etc/init.d/sing-box
#!/bin/sh /etc/rc.common USE_PROCD=1 START=99 STOP=10 PROG="/usr/bin/sing-box" # sing-box内核的位置 CONF_FILE="/etc/sing-box/config.json" #自行创建 WORK_DIR="/etc/sing-box/rule-sets/" #自行创建 start_service() { procd_open_instance "sing-box" procd_set_param command "$PROG" run -c "$CONF_FILE" -D "$WORK_DIR" procd_set_param stdout 1 procd_set_param stderr 1 procd_close_instance }四、 编写sing-box的tproxy配置文件 在inbound处:
{ "type": "tproxy", "tag": "tproxy-in", "listen": "::", "listen_port": 12345, # sing-box监听端口 "tcp_fast_open": true, "udp_fragment": true }在outboud的所有server下加上:
"routing_mark": 1234 # 给出口流量标记,防止回流。与iptables中的设置一致
|
 关注公众号
关注公众号
 发表于 2025-4-14 10:59:26